Red Velvet Cake Balls
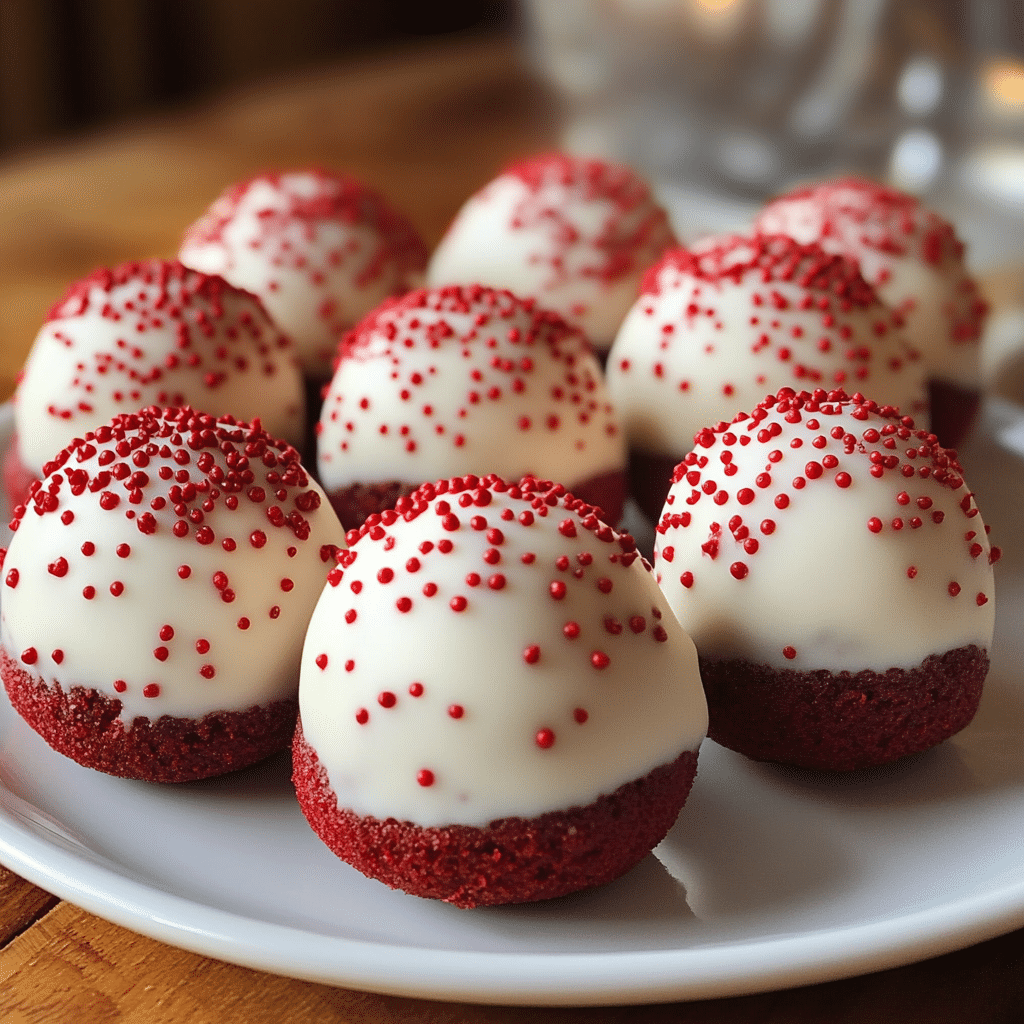
If you have a sweet tooth and love rich, velvety desserts, then you’re in for a treat with these Red Velvet Cake Balls. This recipe offers a delightful way to enjoy classic red velvet cake in a bite-sized, fun form that’s perfect for parties, celebrations, or just satisfying those sudden sweet cravings. Each Red Velvet Cake Ball is moist, flavorful, and coated with a luscious cream cheese or white chocolate shell that makes every bite an irresistible experience.
Why You’ll Love This Recipe
- Perfect Party Treat: Red Velvet Cake Balls are bite-sized and easy to serve, making them ideal for any gathering or celebration.
- Moist and Flavorful: The combination of cocoa and tangy buttermilk creates rich, moist cakes that keep these balls tender and tasty.
- Easy to Customize: You can change the coating or add mix-ins to create unique versions tailored to your preferences.
- Great for Leftovers: Instead of wasting leftover cake, these balls let you transform crumbs into delightful desserts.
- Simple Ingredients: The recipe uses everyday ingredients that deliver exceptional taste without complicated techniques.
Ingredients You’ll Need
Creating delicious Red Velvet Cake Balls requires simple, wholesome ingredients that each play a key role in the cake’s vibrant color, moist texture, and signature flavor. Here’s what you need to gather before getting started.
- All-Purpose Flour: Provides the structure for the cake balls, ensuring they hold together well.
- Cocoa Powder: Adds that subtle chocolate flavor that’s essential for traditional red velvet.
- Granulated Sugar: Sweetens the batter evenly without overpowering the other flavors.
- Buttermilk: Enhances moisture and acidity, which tenderizes the crumb perfectly.
- Vegetable Oil: Keeps the cake soft and prevent it from drying out.
- Eggs: Bind ingredients together and add richness.
- Red Food Coloring: Gives that iconic red hue every red velvet dessert is known for.
- Vanilla Extract: Provides a warm, fragrant background flavor.
- Baking Soda and Vinegar: React to help the cake rise and maintain a tender texture.
- Cream Cheese Frosting: Binds the cake crumbs into balls and coats the outside if desired.
- White or Dark Chocolate for Dipping: Optional but adds a delicious shell that makes each bite even more special.
Variations for Red Velvet Cake Balls
One of the best things about Red Velvet Cake Balls is their flexibility. Whether you’re catering to dietary needs or just want to experiment with flavors, you can easily customize this recipe. Here are some fun and tasty variations to try out.
- Nutty Crunch: Add chopped pecans or walnuts to the cake batter or sprinkle on top for extra texture and flavor.
- Vegan Version: Substitute dairy and eggs with plant-based alternatives like flax eggs and coconut yogurt.
- Spiced Twist: Incorporate a pinch of cinnamon or chili powder for a warm, unexpected kick.
- Specialty Coatings: Dip your cake balls in flavored chocolate or roll them in crushed graham crackers or sprinkles.
- Mini Cheesecake Centers: Insert a small dollop of cheesecake filling inside each ball for an indulgent surprise.

How to Make Red Velvet Cake Balls
Step 1: Bake Your Red Velvet Cake
Start by preparing your favorite red velvet cake recipe or using a boxed mix for convenience. Ensure the cake is fully baked and cooled completely before moving on. Baking the cake evenly is key to having moist, crumbly texture perfect for shaping into balls.
Step 2: Crumble the Cake
Use your hands or a fork to break the cooled cake into fine crumbs in a large bowl. The finer the crumbs, the easier it is to form smooth, uniform balls.
Step 3: Mix in the Frosting
Gradually add cream cheese frosting to the cake crumbs and mix well until combined. The mixture should be moist enough to hold shape but not too sticky or wet. Adjust frosting quantity accordingly.
Step 4: Form the Cake Balls
Using a small cookie scoop or your hands, shape the mixture into uniform balls about 1 inch in diameter. Place them on a parchment-lined baking sheet and chill for at least 1 hour to firm up.
Step 5: Dip in Chocolate Coating
Once chilled, dip each ball into melted white or dark chocolate using a fork or dipping tool, letting the excess drip off. Place them back on parchment to set. For extra flair, decorate with sprinkles or drizzle with contrasting chocolate.
Step 6: Let Them Set and Serve
Allow the coated cake balls to fully harden at room temperature or in the refrigerator before serving. This ensures a perfect crisp shell around the soft cake center.
Pro Tips for Making Red Velvet Cake Balls
- Use Room Temperature Ingredients: This helps frostings and batters mix smoothly for a consistent texture.
- Don’t Overmix Cake Crumbs and Frosting: Mix just enough to hold the balls together, so they don’t get dense or greasy.
- Chill Thoroughly: Cooling the balls ensures that they hold their shape during dipping and coating.
- Work Quickly with Melting Chocolate: Keep chocolate at the right temperature for easy dipping but avoid overheating which can dry out the coating.
- Store Properly: Keep cake balls refrigerated and covered to maintain freshness and prevent drying out.
How to Serve Red Velvet Cake Balls
Garnishes
Garnishing your Red Velvet Cake Balls adds charm and a flavor boost. Consider rolling them in crushed nuts, colorful sprinkles, cocoa powder, or edible glitter to make each bite extra special and visually appealing.
Side Dishes
These cake balls pair wonderfully with a scoop of vanilla or cream cheese ice cream, a cup of hot coffee, or fresh berries for a balanced dessert experience that combines creamy, fruity, and crunchy textures.
Creative Ways to Present
Serve Red Velvet Cake Balls on decorative platters, arrange them on a tiered cake stand, or skewer them onto sticks for cake pops. Wrapping them individually in clear cellophane tied with ribbons makes cute party favors or gifts.
Make Ahead and Storage
Storing Leftovers
Keep leftover Red Velvet Cake Balls in an airtight container in the refrigerator for up to 5 days to maintain their softness and fresh taste. Avoid leaving them at room temperature for extended periods to prevent spoilage.
Freezing
You can freeze these cake balls for up to 3 months by placing them in a single layer on a tray before transferring to a sealed freezer bag, ensuring they don’t stick together or lose their shape.
Reheating
Thaw frozen Red Velvet Cake Balls in the refrigerator overnight and serve cold or at room temperature. Avoid microwaving as the chocolate coating can melt and texture might change.
FAQs
Can I use a boxed cake mix for Red Velvet Cake Balls?
Absolutely! Boxed cake mixes work well and save time, just be sure to follow package instructions for baking and cooling before crumbling.
What is the best frosting to bind Red Velvet Cake Balls?
Cream cheese frosting is the classic choice due to its tangy flavor and creamy texture, but buttercream can also be used depending on your preference.
How do I prevent cake balls from falling apart?
Make sure your cake is moist but not too wet, and add frosting gradually until you reach a consistency that holds together without being too sticky.
Can I make Red Velvet Cake Balls without food coloring?
Yes, but the signature red hue is from the food coloring; without it, the balls will be more chocolate-colored but still tasty.
Is it necessary to dip the cake balls in chocolate?
While not required, dipping adds a delicious shell and makes the balls easier to handle without crumbling, plus it looks prettier!
Final Thoughts
These Red Velvet Cake Balls are pure joy in every bite — easy to make, endlessly customizable, and perfect for sharing with loved ones. Whether you’re throwing a party or simply craving a sweet snack, giving this recipe a try is sure to become a favorite. So roll up your sleeves and enjoy the rich, moist, and colorful magic of these delightful bites!
Related Posts
PrintRed Velvet Cake Balls

Delight in these moist, flavorful Red Velvet Cake Balls, perfect bite-sized treats coated in luscious cream cheese frosting or white chocolate. Ideal for parties or satisfying sweet cravings, these cake balls combine the classic red velvet flavor with an easy-to-make, customizable format that transforms leftover cake crumbs into irresistible desserts.
- Prep Time: 20 minutes
- Cook Time: 30 minutes
- Total Time: 1 hour 50 minutes
- Yield: About 24 cake balls 1x
- Category: Appetizers
- Method: Baking
- Cuisine: American
- Diet: Gluten Free
Ingredients
Dry Ingredients
- 1 1/4 cups all-purpose flour
- 2 tablespoons cocoa powder
- 1 cup granulated sugar
- 1/2 teaspoon baking soda
Wet Ingredients
- 1/2 cup buttermilk
- 1/2 cup vegetable oil
- 2 large eggs
- 2 tablespoons red food coloring
- 1 teaspoon vanilla extract
- 1 teaspoon white vinegar
For Binding and Coating
- 1 cup cream cheese frosting (store-bought or homemade)
- 8 ounces white or dark chocolate, melted (for dipping, optional)
Instructions
- Step 1: Bake Your Red Velvet Cake. Prepare your favorite red velvet cake recipe or use a boxed mix following package instructions. Bake until fully cooked and allow to cool completely to ensure a moist and crumbly texture ideal for forming balls.
- Step 2: Crumble the Cake. Break the cooled cake into fine crumbs using your hands or a fork in a large bowl, aiming for smooth, uniform consistency for easy shaping.
- Step 3: Mix in the Frosting. Gradually add cream cheese frosting to the cake crumbs, mixing well until the mixture holds together but is not overly sticky. Adjust the frosting amount as necessary for the right texture.
- Step 4: Form the Cake Balls. Shape the mixture into 1-inch diameter balls using a small cookie scoop or your hands. Place on a parchment-lined baking sheet and chill for at least 1 hour to firm up.
- Step 5: Dip in Chocolate Coating. Dip each chilled ball into melted white or dark chocolate with a fork or dipping tool, letting excess drip off. Place back on parchment paper and optionally decorate with sprinkles or drizzled chocolate. Allow to set completely.
- Step 6: Let Them Set and Serve. Let the coated cake balls harden fully at room temperature or in the refrigerator before serving to ensure a crisp shell with a soft interior.
Notes
- Use room temperature ingredients for smooth mixing.
- Mix cake crumbs and frosting just enough to bind the mixture without making it dense.
- Chill the cake balls thoroughly before dipping to maintain shape.
- Keep melted chocolate at the right temperature to avoid drying out the coating.
- Store cake balls refrigerated in airtight containers to keep them fresh up to 5 days.
- Freeze in a single layer in a sealed bag for up to 3 months.
- Thaw frozen cake balls overnight in the refrigerator and serve cold or at room temperature; avoid microwaving.
Nutrition
- Serving Size: 1 cake ball
- Calories: 120
- Sugar: 12g
- Sodium: 90mg
- Fat: 7g
- Saturated Fat: 3g
- Unsaturated Fat: 3.5g
- Trans Fat: 0g
- Carbohydrates: 14g
- Fiber: 1g
- Protein: 1.5g
- Cholesterol: 20mg
Keywords: Red Velvet, Cake Balls, Cream Cheese Frosting, Party Treats, Bite-Sized Desserts