Perfectly Soft & Chewy Red Velvet Thumbprint Cookies

Get ready to bake a batch of Pure joy with this recipe for Perfectly Soft & Chewy Red Velvet Thumbprint Cookies. These cookies are wonderfully tender, with that iconic deep red color and a slight tang from cream cheese filling or other sweet centers you might choose. Whether you’re new to baking or a seasoned pro, this easy-to-follow guide will walk you through creating irresistibly soft, chewy, and flavorful thumbprint cookies that disappear fast and leave everyone asking for more.
Why You’ll Love This Recipe
- Unique Texture: These cookies strike the perfect balance between softness and chewiness, unlike typical crumbly cookies.
- Rich Flavor: The classic red velvet taste, enhanced by cocoa and a hint of vanilla, brings a nostalgic twist to your cookie jar.
- Simple Ingredients: Made with pantry staples, so you likely have everything on hand to get started immediately.
- Customizable Filling: Whether cream cheese, chocolate ganache, or jam, you can tailor these cookies to any craving.
- Great for Gifting: Vibrant, charming, and delicious, these cookies make perfect holiday or party treats.
Ingredients You’ll Need
Making Perfectly Soft & Chewy Red Velvet Thumbprint Cookies starts with a handful of basic ingredients that combine to create that signature softness and vibrant color. Each component plays a vital role, from the tangy buttermilk to the cocoa powder’s subtle richness and the cream cheese for that luscious filling.
- All-Purpose Flour: Provides structure and softness without making cookies tough.
- Cocoa Powder: Adds subtle chocolate flavor critical for authentic red velvet.
- Baking Soda: Helps the cookies rise slightly and keeps them light.
- Salt: Balances the sweetness and enhances overall flavor.
- Unsalted Butter: Creamed to add richness and moisture.
- Sugar: Sweetens and contributes to chewiness.
- Egg: Binds ingredients and supports soft texture.
- Vanilla Extract: Deepens flavor notes with a warm touch.
- Buttermilk or Milk with Vinegar: Adds tang and moisture for tender crumb.
- Red Food Coloring: Creates the distinct red velvet look.
- Cream Cheese Filling: For smooth, tangy centers (optional but highly recommended).
Variations for Perfectly Soft & Chewy Red Velvet Thumbprint Cookies
This recipe is as versatile as your imagination. Feel free to tweak the fillings or even the dough itself to accommodate dietary preferences or simply to surprise your taste buds.
- Nutella Filling: Swap the cream cheese for luscious Nutella to add a hazelnut-chocolate twist.
- Jam Centers: Raspberry or strawberry jam pairs beautifully with the cocoa undertones.
- Vegan Adaptation: Use plant-based butter and a flax egg replacement for an animal-free delight.
- Gluten-Free Flour: Substitute with a gluten-free baking mix for those with gluten sensitivities.
- Spiced Variation: Add cinnamon or nutmeg to the dough for a warm, cozy flavor profile.

How to Make Perfectly Soft & Chewy Red Velvet Thumbprint Cookies
Step 1: Prepare the Dough
Start by whisking together your dry ingredients – flour, cocoa powder, baking soda, and salt. In another bowl, cream butter and sugar until fluffy, then add the egg, vanilla, and red food coloring. Gradually incorporate the dry mix and buttermilk, mixing just until combined for a tender dough.
Step 2: Chill the Dough
Wrap your dough in plastic wrap and refrigerate it for at least 30 minutes. Chilling makes it easier to handle and helps the cookies hold their shape during baking, while improving texture.
Step 3: Shape and Bake
Preheat your oven to 350°F (175°C). Scoop tablespoon-sized portions of dough and roll into balls, then place on a parchment-lined baking sheet. Using your thumb or the back of a spoon, gently press an indentation into the center without going through the dough. Bake for about 10-12 minutes, until the edges are set but centers are soft.
Step 4: Add the Filling
Immediately after removing the cookies from the oven, press the thumbprint again if needed, then fill each indentation with your cream cheese mixture or chosen filling while still warm so it settles perfectly.
Step 5: Cool and Enjoy
Let the cookies cool completely on a wire rack. This final step ensures they firm up just enough for perfect bite-worthy texture, making your Perfectly Soft & Chewy Red Velvet Thumbprint Cookies truly irresistible.
Pro Tips for Making Perfectly Soft & Chewy Red Velvet Thumbprint Cookies
- Use Room Temperature Ingredients: This helps everything combine smoothly for consistent texture.
- Do Not Overmix: Mixing too long can toughen the dough, which will affect softness.
- Chill Dough Properly: Don’t skip this step to keep your cookies from spreading too much.
- Indent Immediately After Baking: Pressing a second time helps keep your thumbprints neat and filling perfectly nestled.
- Choose High-Quality Cocoa and Vanilla: These enhance flavors and deepen color naturally.
How to Serve Perfectly Soft & Chewy Red Velvet Thumbprint Cookies
Garnishes
Sprinkle a little powdered sugar or cocoa on top of the cookies or add a tiny fresh raspberry or mint leaf for festive elegance and extra flavor pop.
Side Dishes
Serve with a cold glass of milk, a rich cup of coffee, or a smooth hot chocolate to complement the velvety texture and elevate your cookie experience.
Creative Ways to Present
Arrange cookies on a tiered dessert tray for parties, or stack them with little paper doilies and tie with festive ribbon for homemade gifts that look as good as they taste.
Make Ahead and Storage
Storing Leftovers
Keep your cookies in an airtight container at room temperature for up to 3 days to maintain their signature softness and chewy texture.
Freezing
Freeze unfilled cookie dough balls or baked cookies separately on a baking sheet, then transfer to freezer bags for up to 3 months. Defrost them in the fridge overnight before filling if freezing dough.
Reheating
Warm leftover cookies briefly in a preheated 300°F (150°C) oven for 5 minutes to restore softness and enhance chewiness before serving.
FAQs
Can I make these cookies without red food coloring?
Yes! While the red color is iconic, you can skip the food coloring or use natural alternatives like beet powder, but keep in mind the deep red velvet appearance will be less pronounced.
What if I don’t have buttermilk?
Simply stir 1 tablespoon of white vinegar or lemon juice into 1 cup of milk and let it sit for 5 minutes. This homemade substitute works great to add the necessary tang and moisture.
Can I use store-bought cream cheese filling?
Absolutely! While homemade cream cheese filling tastes best, store-bought versions or other soft fillings like Nutella or jam work wonderfully and save time.
How do I prevent my cookies from spreading too much?
Make sure to chill the dough thoroughly before baking and avoid using melted butter, which can cause excessive spreading.
Are these cookies suitable for freezing after baking?
Yes, you can freeze baked cookies and thaw them at room temperature; just avoid freezing after adding perishable fillings to maintain freshness and texture.
Final Thoughts
There’s something truly special about sinking your teeth into Perfectly Soft & Chewy Red Velvet Thumbprint Cookies. With their tender texture, delightful flavor, and endless possibilities for customization, these cookies are sure to become your new favorite to bake and share. So why wait? Gather your ingredients, roll up your sleeves, and treat yourself and your loved ones to these little bites of happiness today!
Related Posts
PrintPerfectly Soft & Chewy Red Velvet Thumbprint Cookies
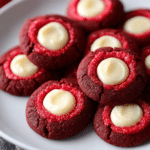
Bake a batch of Perfectly Soft & Chewy Red Velvet Thumbprint Cookies that boast a tender texture and iconic deep red color. These cookies offer a nostalgic red velvet flavor enhanced with cocoa, a subtle hint of vanilla, and a customizable sweet center such as cream cheese, Nutella, or jam. Ideal for gifting or serving at parties, they combine pantry staples into an easy, delightful baking experience suitable for beginners and seasoned bakers alike.
- Prep Time: 20 minutes
- Cook Time: 12 minutes
- Total Time: 42 minutes
- Yield: 24 cookies 1x
- Category: Dessert
- Method: Baking
- Cuisine: American
- Diet: Vegetarian
Ingredients
Dry Ingredients
- 2 1/2 cups All-Purpose Flour
- 1/4 cup Cocoa Powder
- 1 teaspoon Baking Soda
- 1/2 teaspoon Salt
Wet Ingredients
- 1 cup Unsalted Butter, softened
- 1 1/4 cups Sugar
- 1 large Egg
- 1 teaspoon Vanilla Extract
- 2 tablespoons Buttermilk (or 2 tablespoons milk + 1 teaspoon white vinegar)
- 2 teaspoons Red Food Coloring
Filling
- 1/2 cup Cream Cheese Filling (or Nutella, jam, or other preferred sweet centers)
Instructions
- Prepare the Dough: Whisk together the flour, cocoa powder, baking soda, and salt in a medium bowl. In a separate large bowl, cream together the softened butter and sugar until fluffy. Beat in the egg, vanilla extract, and red food coloring until combined. Gradually add the dry ingredient mixture alternately with buttermilk, mixing just until you have a tender dough.
- Chill the Dough: Wrap the dough in plastic wrap and refrigerate for at least 30 minutes. This step firms up the dough, making it easier to handle and preventing excessive spreading when baked.
- Shape and Bake: Preheat the oven to 350°F (175°C). Scoop tablespoon-sized portions of dough and roll into balls. Arrange them on a parchment-lined baking sheet, spacing evenly. Using your thumb or the back of a spoon, gently press an indentation into the center of each cookie without breaking through the dough. Bake for 10-12 minutes, or until edges are set but centers remain soft.
- Add the Filling: Immediately after removing from the oven, press down on the thumbprint again if necessary to deepen the indentation. Fill each with cream cheese mixture or the filling of your choice while the cookies are still warm, allowing the filling to settle perfectly.
- Cool and Enjoy: Transfer cookies to a wire rack and allow to cool completely. Cooling lets them firm up to the ideal soft and chewy texture that makes these thumbprint cookies irresistible.
Notes
- Use room temperature ingredients for better mixing and consistent texture.
- Do not overmix the dough to avoid tough cookies.
- Chilling the dough is essential to prevent spreading during baking.
- Indent the thumbprints immediately after baking as well as before to maintain neat centers.
- Use high-quality cocoa powder and vanilla extract for deeper, richer flavor and color.
- If buttermilk is unavailable, substitute with 1 tablespoon white vinegar or lemon juice plus milk, let sit 5 minutes.
- Cookie dough and baked cookies can be frozen separately for up to 3 months.
- Reheat leftover cookies at 300°F (150°C) for 5 minutes to restore softness.
- Store cookies in an airtight container at room temperature for up to 3 days to keep them fresh.
Nutrition
- Serving Size: 1 cookie
- Calories: 150 kcal
- Sugar: 12 g
- Sodium: 90 mg
- Fat: 8 g
- Saturated Fat: 4.5 g
- Unsaturated Fat: 3 g
- Trans Fat: 0 g
- Carbohydrates: 18 g
- Fiber: 1 g
- Protein: 2 g
- Cholesterol: 25 mg
Keywords: red velvet cookies, thumbprint cookies, soft and chewy cookies, cream cheese filled cookies, holiday cookies, easy cookie recipe