How to Make Strawberry Crunch Cheesecake Cones
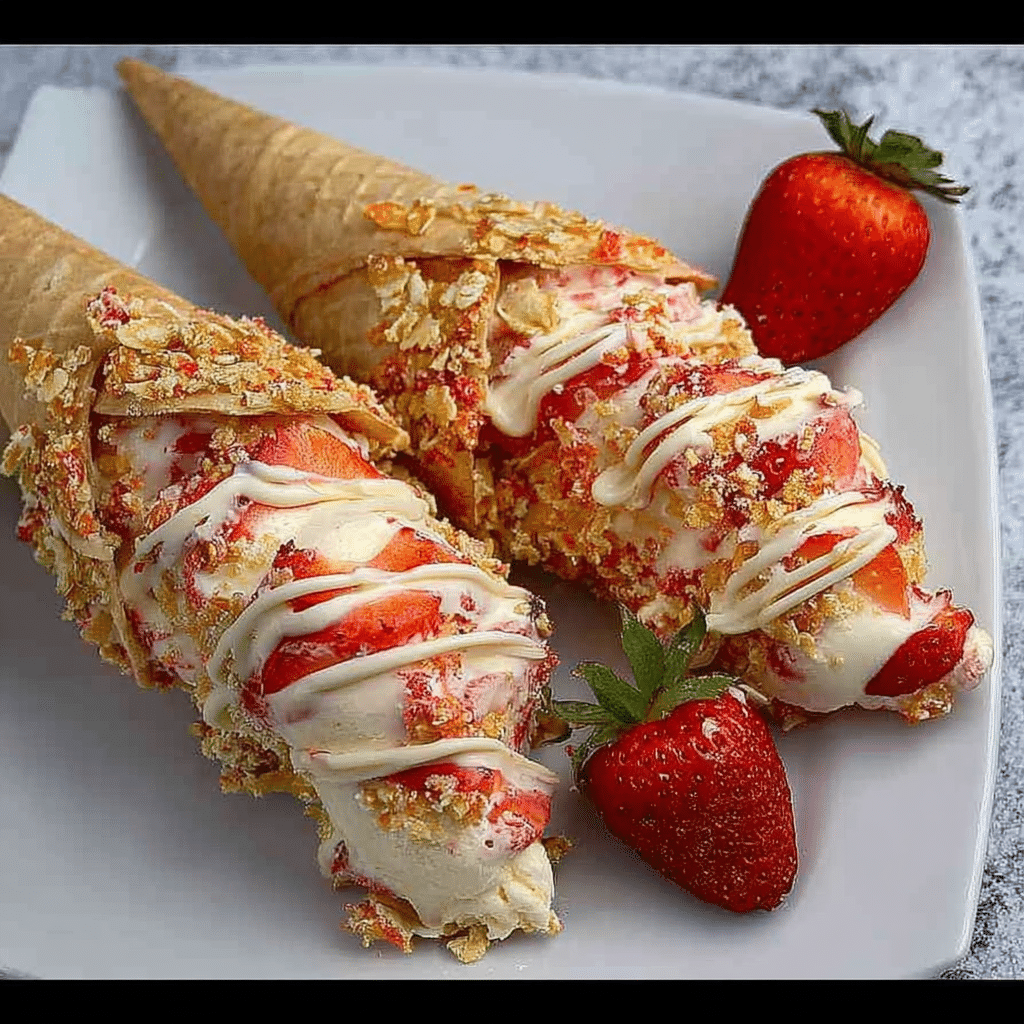
If you’re on the hunt for a dessert that’s both delightfully creamy and loaded with fresh, juicy berries combined with an irresistible crunch, look no further than Strawberry Crunch Cheesecake Cones. This fun and easy recipe transforms the classic flavors of cheesecake and strawberries into a portable, handheld treat that’s perfect for gatherings, parties, or simply indulging yourself on a sunny afternoon. Bursting with layers of smooth cheesecake filling, sweet strawberries, and crunchy cone goodness, these cones are a sensational way to enjoy a classic dessert with a playful twist.
Why You’ll Love This Recipe
- Simple yet impressive: Strawberry Crunch Cheesecake Cones are easy to assemble but look and taste like something made by a pro.
- Perfectly portable: These cones are individually portioned, making them a mess-free dessert for picnics, parties, and family gatherings.
- Fresh and crunchy: Combining juicy strawberries with crispy cones offers a delightful contrast in flavors and textures.
- Customizable and versatile: You can easily swap ingredients to suit dietary needs or personal preferences.
- No-bake delight: This recipe requires no oven time, making it a great option for warm weather or quick treats.
Ingredients You’ll Need
The magic of Strawberry Crunch Cheesecake Cones comes from simple, fresh ingredients that each play a special role in delivering the perfect balance of creaminess, sweetness, and crunch. Here’s what you’ll need to whip up this delicious dessert:
- Cream cheese: Provides the rich, smooth base that makes the cheesecake filling creamy and soft.
- Powdered sugar: Adds a gentle sweetness without graininess, blending perfectly into the cream cheese.
- Vanilla extract: Enhances the overall flavor, imparting a warm, sweet aroma to the filling.
- Heavy whipping cream: Whipped until fluffy, it lightens the texture of the filling for a melt-in-your-mouth feel.
- Fresh strawberries: Offer juicy bursts of flavor and a vibrant red color for freshness and sweetness.
- Wilton Crunchy Sprinkle or similar: Adds that essential crunchy texture that pairs beautifully with the creamy filling.
- Wafer cones: The perfect crunchy vessel for holding all the delicious layers of the dessert.
Variations for Strawberry Crunch Cheesecake Cones
One of the best things about this recipe is how easy it is to customize. Whether you want to switch up the flavors, cater to dietary preferences, or add a little extra flair, these ideas will help you make the Strawberry Crunch Cheesecake Cones your own:
- Berry swap: Use raspberries, blueberries, or blackberries instead of strawberries for a new fruity twist.
- Chocolate crunch: Add mini chocolate chips or crushed chocolate wafer cookies to increase the chocolatey goodness.
- Dairy-free option: Substitute cream cheese and whipping cream with coconut cream and vegan cream cheese alternatives.
- Nutty texture: Sprinkle chopped toasted almonds or pecans on top instead of traditional crunchy sprinkles.
- Mini bites: Use smaller cones or cut larger cones in half for bite-sized dessert portions perfect for parties.

How to Make Strawberry Crunch Cheesecake Cones
Step 1: Prepare the Cheesecake Filling
Start by beating the cream cheese until it’s smooth and free of lumps. Gradually add powdered sugar and vanilla extract, blending until combined. In a separate bowl, whip the heavy cream until stiff peaks form, then gently fold it into the cream cheese mixture, creating a light and creamy cheesecake filling.
Step 2: Slice the Strawberries
Wash and pat dry fresh strawberries. Slice them into small pieces or thin slices to ensure every bite of your cheesecake cone has a juicy burst of flavor.
Step 3: Assemble the Cones
Hold each wafer cone upright and carefully spoon a small amount of the creamy cheesecake filling inside, filling it about one-third full. Add a layer of sliced strawberries, then sprinkle a generous amount of crunchy sprinkles or your chosen crunchy ingredient. Repeat the layers until the cone is full, finishing with a sprinkle of crunch on top.
Step 4: Chill and Serve
Place the assembled cones in a cone holder or an upright container and refrigerate for at least 30 minutes to allow flavors to meld and the filling to firm up slightly. Serve chilled for the best experience.
Pro Tips for Making Strawberry Crunch Cheesecake Cones
- Use cold ingredients: Keeping the cream cheese and whipping cream cold makes for a smoother, fluffier filling.
- Don’t overmix: Fold the whipped cream gently to maintain its light, airy texture.
- Prep cones carefully: Avoid filling cones too early to keep cones from getting soggy.
- Fresh strawberries matter: The juicier and riper your berries, the more flavorful your cones will be.
- Serve promptly: These are best enjoyed within a few hours of assembly for maximum crunch.
How to Serve Strawberry Crunch Cheesecake Cones
Garnishes
Enhance the presentation by adding a fresh strawberry slice, a mint leaf, or a drizzle of strawberry sauce on top. A dusting of powdered sugar can add a lovely finishing touch.
Side Dishes
Pair your Strawberry Crunch Cheesecake Cones with simple sides like a crisp green salad or a light sparkling lemonade to balance out the rich sweetness.
Creative Ways to Present
Set the cones upright in a decorative cone holder or a repurposed muffin tin lined with parchment paper for an eye-catching display. For parties, arrange a “build-your-own” station with extra toppings and fillings so guests can customize their cones.
Make Ahead and Storage
Storing Leftovers
Keep any leftover Strawberry Crunch Cheesecake Cones covered in the refrigerator; they will stay fresh for up to two days, though the cones may lose some crunch over time.
Freezing
While the filling can be frozen separately in an airtight container, assembled cones don’t freeze well due to the fragile wafer cones, which can become soggy and lose texture.
Reheating
These cones are best served chilled, so no reheating is necessary. If the cones lose their crunch, consider using fresh cones for serving leftovers.
FAQs
Can I make Strawberry Crunch Cheesecake Cones without fresh strawberries?
Yes! Frozen strawberries can be thawed and drained before using, but fresh strawberries give the best texture and flavor.
How long does it take to make this recipe?
From start to finish, assembling Strawberry Crunch Cheesecake Cones takes about 20 to 30 minutes, plus chilling time for optimal flavor.
Are these cones suitable for kids?
Absolutely. These are a fun and safe dessert option kids love due to their sweet taste and fun presentation.
Can I use flavored cream cheese?
While plain cream cheese is recommended for balance, experimenting with strawberry or vanilla-flavored cream cheese can add extra flavor dimension.
What can I use if I can’t find crunchy sprinkles?
You can substitute with crushed graham crackers, chopped nuts, or mini cookie bits for the crunchy layer in the cones.
Final Thoughts
Strawberry Crunch Cheesecake Cones are a joyous treat to make and even more delightful to eat. With their smooth cheesecake filling, fresh strawberry sweetness, and satisfying crunch, they bring that wow factor without fuss. Whether you’re planning a casual get-together or just want to pamper yourself, give this recipe a try — your taste buds will thank you!
Related Posts
- Best Oreo Cheesecake Recipes to Try Now
- Why Peach Butter Swim Biscuits Are So Delicious
- How to Make Hot Fudge Pie in 5 Steps
Strawberry Crunch Cheesecake Cones
Strawberry Crunch Cheesecake Cones are a delightful no-bake dessert featuring creamy cheesecake filling layered with fresh, juicy strawberries and crunchy wafer cones. Perfectly portable and easy to assemble, these cones offer a refreshing blend of smooth, sweet, and crunchy textures ideal for parties, picnics, or casual indulgence.
- Prep Time: 15 minutes
- Cook Time: 0 minutes
- Total Time: 45 minutes (including chilling time)
- Yield: 6-8 cones 1x
- Category: Dessert
- Method: No-bake
- Cuisine: American
- Diet: Gluten Free
Ingredients
Cheesecake Filling
- 8 oz cream cheese, softened
- 1 cup powdered sugar
- 1 tsp vanilla extract
- 1 cup heavy whipping cream
Fruit and Crunch
- 1 cup fresh strawberries, washed and sliced
- Wilton Crunchy Sprinkle or similar crunchy topping, as needed
Assembly
- 6–8 wafer cones
Instructions
- Prepare the Cheesecake Filling: Beat the cream cheese until smooth and free of lumps. Gradually add powdered sugar and vanilla extract, mixing until fully combined. In a separate bowl, whip the heavy cream until stiff peaks form, then gently fold it into the cream cheese mixture to create a light and creamy filling.
- Slice the Strawberries: Wash and pat dry fresh strawberries. Slice into small pieces or thin slices to ensure each bite has a juicy burst of flavor.
- Assemble the Cones: Hold each wafer cone upright and spoon a small amount of cheesecake filling inside, filling about one-third full. Add a layer of sliced strawberries, then sprinkle a generous amount of crunchy topping. Repeat layers until the cone is full, finishing with a sprinkle of crunch on top.
- Chill and Serve: Place the assembled cones in a cone holder or an upright container and refrigerate for at least 30 minutes to let the flavors meld and the filling firm up slightly. Serve chilled for the best taste and texture.
Notes
- Use cold cream cheese and whipping cream for smoother, fluffier filling.
- Fold whipped cream gently to maintain airy texture.
- Fill cones shortly before serving to avoid sogginess.
- Choose ripe, juicy strawberries for best flavor.
- Enjoy cones within a few hours for maximum crunch.
Nutrition
- Serving Size: 1 cone
- Calories: 250
- Sugar: 20g
- Sodium: 150mg
- Fat: 18g
- Saturated Fat: 11g
- Unsaturated Fat: 6g
- Trans Fat: 0g
- Carbohydrates: 15g
- Fiber: 1g
- Protein: 3g
- Cholesterol: 50mg
Keywords: strawberry cheesecake, no-bake dessert, portable dessert, wafer cones, creamy cheesecake, summer dessert, berry dessert, easy dessert
