Easy Pistachio Tiramisu No Eggs You Must Try
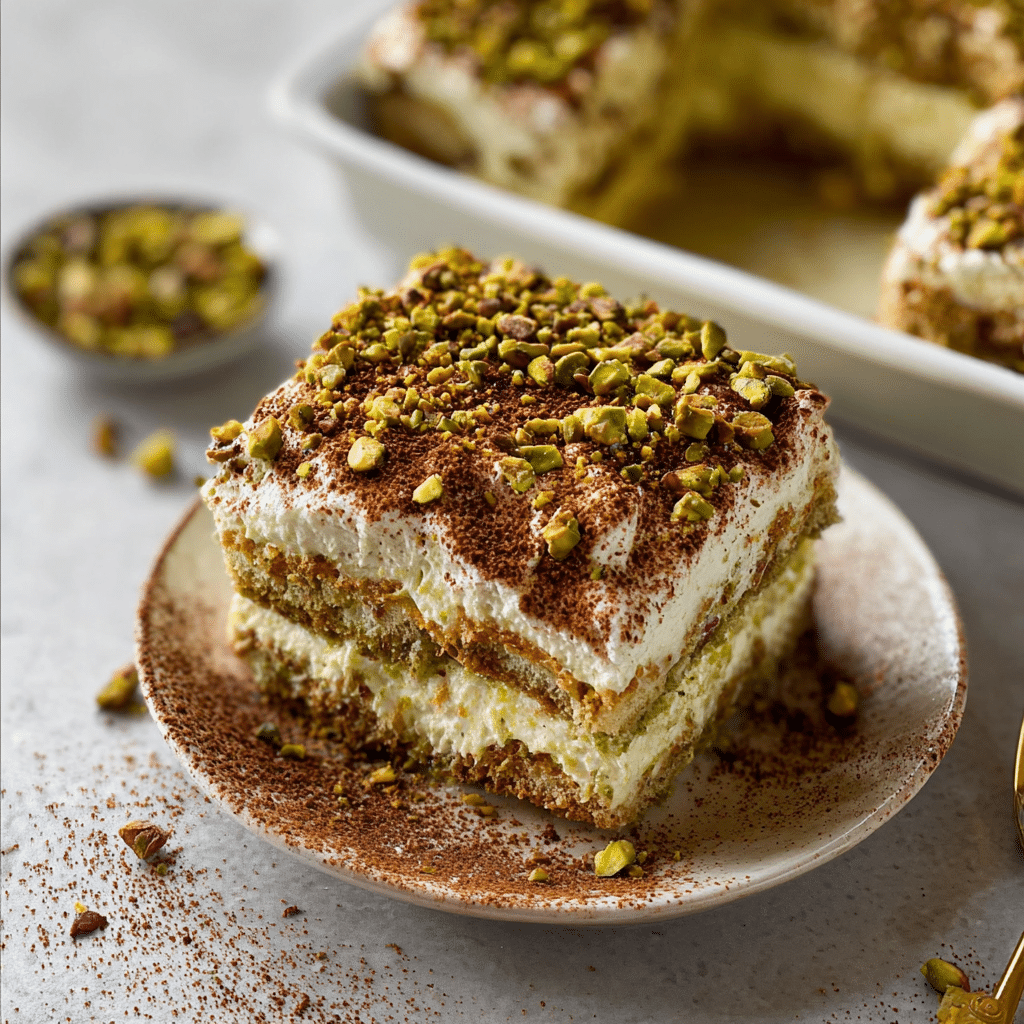
Discover a creamy, egg-free delight with Easy Pistachio Tiramisu No Eggs, a luscious twist on the classic Italian dessert that brings the nutty richness of pistachios together with smooth layers of mascarpone and coffee-soaked ladyfingers. This recipe is perfect for anyone looking to enjoy a decadent tiramisu without eggs, combining simplicity and flavor in a way that’s sure to impress at any gathering or for a cozy night in.
Why You’ll Love This Recipe
- Egg-Free and Allergy Friendly: This tiramisu skips eggs for a safer treat that’s perfect for those with egg allergies or dietary preferences.
- Rich Pistachio Flavor: The pistachio paste adds a unique, nutty depth that elevates the traditional tiramisu experience.
- Simple Ingredients: Made with easy-to-find pantry staples plus pistachios for a fuss-free preparation.
- Quick Assembly: No complicated techniques or long cooking times—perfect for beginners or last-minute dessert needs.
- Perfect Texture: Silky mascarpone and whipped cream blend smoothly without eggs, giving you that classic creamy tiramisu feel.
Ingredients You’ll Need
Every ingredient in this Easy Pistachio Tiramisu No Eggs has purpose—from the crunchy pistachios to the velvety mascarpone, creating a perfect balance of flavors and textures. These essential ingredients will help you build each luscious layer effortlessly.
- Mascarpone Cheese: The silky, creamy base for tiramisu that provides richness without eggs.
- Pistachio Paste: Adds vibrant color and nutty flavor, making this tiramisu truly unique.
- Ladyfingers: Light, crisp cookies that soak up the coffee perfectly, softening just right.
- Strong Coffee or Espresso: Essential for dipping ladyfingers to infuse the classic coffee flavor.
- Heavy Whipping Cream: Whipped to soft peaks, this adds volume and lightness to the mascarpone mixture.
- Powdered Sugar: Sweetens gently and blends seamlessly into the cream.
- Pistachio Nuts (chopped): For garnish, adding crunch and a pop of color on top.
- Vanilla Extract: Enhances all flavors and brings subtle warmth to every bite.
Variations for Easy Pistachio Tiramisu No Eggs
This recipe is wonderfully flexible, making it easy to adjust according to what you have on hand or your unique tastes. Feel free to personalize your dessert and make it truly your own!
- Chocolate Pistachio Twist: Add a layer of chocolate ganache or sprinkle cocoa powder along with pistachios for extra indulgence.
- Fruit Infused: Incorporate fresh berries or sliced figs between layers for a fruity contrast.
- Vegan Version: Substitute mascarpone with cashew cream and use dairy-free cream alternatives to go fully plant-based.
- Alcohol-Free Coffee: Simply use decaffeinated or regular brewed coffee without liqueur for a kid-friendly or non-alcoholic option.
- Crunchy Texture: Mix chopped pistachios into the mascarpone layer for an unexpected crunch inside.

How to Make Easy Pistachio Tiramisu No Eggs
Step 1: Prepare the Coffee
Brew strong coffee or espresso and let it cool completely to room temperature to avoid soggy ladyfingers.
Step 2: Whip the Cream
In a chilled bowl, whip the heavy cream with powdered sugar and vanilla extract until soft peaks form, creating the perfect airy texture.
Step 3: Mix Mascarpone and Pistachio Paste
Gently fold pistachio paste into the mascarpone cheese until creamy and well combined, then carefully fold this mixture into the whipped cream for lightness.
Step 4: Dip Ladyfingers
Quickly dip each ladyfinger into coffee, soaking just enough so they absorb flavor without becoming too soggy.
Step 5: Layer the Dessert
Arrange a layer of dipped ladyfingers in your serving dish. Spread half of the pistachio mascarpone cream over the top, then repeat with another layer of dipped ladyfingers and finish with the remaining cream.
Step 6: Chill and Garnish
Refrigerate the tiramisu for at least 4 hours or overnight to let the flavors meld. Before serving, top with chopped pistachios for crunch and a sprinkle of pistachio powder if desired.
Pro Tips for Making Easy Pistachio Tiramisu No Eggs
- Use Room Temperature Mascarpone: This helps it blend smoothly without clumps in the cream mixture.
- Don’t Over-Soak Ladyfingers: A quick dip in coffee keeps them perfectly moist without turning mushy.
- Chill Thoroughly: Giving the tiramisu enough time in the fridge allows the flavors to develop and textures to firm up.
- Fresh Pistachios Are Key: Use fresh, unsalted pistachios for garnish to enhance color and crunchy texture.
- Whip Cream Properly: Stop whipping as soon as soft peaks form to maintain a light and fluffy texture.
How to Serve Easy Pistachio Tiramisu No Eggs
Garnishes
Top your tiramisu with vibrant green chopped pistachios, a dusting of pistachio powder, or even a drizzle of white chocolate for an elegant finish.
Side Dishes
Pair this luscious dessert with fresh berries, a light mint salad, or a small cup of rich espresso to complement the creamy pistachio flavors perfectly.
Creative Ways to Present
Serve Easy Pistachio Tiramisu No Eggs in individual glass jars for charming personal servings or layer it in a trifle dish for a stunning centerpiece dessert.
Make Ahead and Storage
Storing Leftovers
Keep leftovers covered in the refrigerator for up to 3 days to maintain freshness and creamy texture.
Freezing
This tiramisu can be frozen for up to 1 month, but remember to thaw it in the refrigerator overnight before serving to preserve texture.
Reheating
Since tiramisu is best served chilled, avoid reheating; instead, enjoy it straight from the fridge for maximum flavor and creaminess.
FAQs
Can I use other nuts instead of pistachios?
Absolutely! While pistachios give this tiramisu its signature flavor and color, almonds or hazelnuts can be substituted, though the taste will slightly differ.
Is this recipe suitable for vegans?
The classic Easy Pistachio Tiramisu No Eggs uses dairy, but you can make it vegan by replacing mascarpone with cashew cream and using coconut or soy whipping cream.
Do I need to use espresso coffee?
Espresso is ideal for a strong coffee flavor, but strong brewed coffee works perfectly fine and is easier to prepare at home.
How long does it take to set in the fridge?
For the best texture and flavor, let it chill for at least 4 hours; overnight chilling is often preferred to fully develop the layers.
Can I prepare this tiramisu a day in advance?
Yes, Easy Pistachio Tiramisu No Eggs is even better the next day when the flavors have melded, making it a great make-ahead dessert.
Final Thoughts
Easy Pistachio Tiramisu No Eggs is a delightful dessert that proves you don’t need eggs to create creamy, comforting tiramisu magic. Its simple ingredients and irresistible nutty flavor make it a perfect treat to share or savor alone. Give it a try—you’ll quickly find it becoming a favorite for its ease, taste, and charm.
Related Posts
- Irresistible Mini Easter Carrot Cakes to Try
- How to Make Easter Swirl Cheesecake Pie
- Why Cotton Candy Cheesecake Is a Must-Try Dessert
Easy Pistachio Tiramisu No Eggs
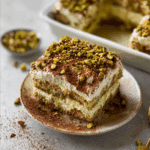
Easy Pistachio Tiramisu No Eggs is a creamy, egg-free twist on the classic Italian dessert, featuring luscious layers of mascarpone and pistachio paste combined with coffee-soaked ladyfingers. This recipe delivers a rich nutty flavor and smooth texture without eggs, making it perfect for those with allergies or dietary preferences. Quick to assemble and made with simple ingredients, it’s ideal for impressive gatherings or cozy nights in.
- Prep Time: 20 minutes
- Cook Time: 0 minutes
- Total Time: 4 hours 20 minutes (including chilling time)
- Yield: 6 servings 1x
- Category: Dessert
- Method: No-Bake
- Cuisine: Italian
- Diet: Egg-Free
Ingredients
Mascarpone Mixture
- 250g Mascarpone Cheese (room temperature)
- 100g Pistachio Paste
- 200ml Heavy Whipping Cream
- 50g Powdered Sugar
- 1 tsp Vanilla Extract
Base
- 200g Ladyfingers
- 240ml Strong Coffee or Espresso (cooled to room temperature)
Garnish
- 30g Pistachio Nuts (chopped, fresh and unsalted)
- Optional: Pistachio Powder for dusting
- Optional: White Chocolate Drizzle
Instructions
- Prepare the Coffee: Brew strong coffee or espresso and allow it to cool completely to room temperature to prevent the ladyfingers from becoming soggy.
- Whip the Cream: In a chilled bowl, whip the heavy cream with powdered sugar and vanilla extract until soft peaks form, creating a light and airy texture.
- Mix Mascarpone and Pistachio Paste: Gently fold the pistachio paste into the mascarpone cheese until smooth and well combined. Then carefully fold this mixture into the whipped cream to maintain lightness.
- Dip Ladyfingers: Quickly dip each ladyfinger into the cooled coffee, soaking them just enough to absorb the flavor without becoming mushy.
- Layer the Dessert: Arrange a layer of dipped ladyfingers in your serving dish. Spread half of the pistachio mascarpone cream over the ladyfingers. Repeat with another layer of dipped ladyfingers and top with the remaining cream.
- Chill and Garnish: Refrigerate the tiramisu for at least 4 hours or overnight to allow flavors to meld and textures to set. Before serving, garnish with chopped pistachios and a sprinkle of pistachio powder or a drizzle of white chocolate if desired.
Notes
- Use room temperature mascarpone to ensure a smooth blend without lumps.
- Do not over-soak ladyfingers; a quick dip keeps them moist but firm.
- Chill thoroughly to develop flavors and achieve the perfect texture.
- Fresh, unsalted pistachios enhance both taste and crunch in the garnish.
- Stop whipping cream at soft peaks to maintain a light and fluffy texture.
Nutrition
- Serving Size: 1 serving
- Calories: 350 kcal
- Sugar: 18 g
- Sodium: 90 mg
- Fat: 28 g
- Saturated Fat: 15 g
- Unsaturated Fat: 10 g
- Trans Fat: 0 g
- Carbohydrates: 20 g
- Fiber: 1.5 g
- Protein: 5 g
- Cholesterol: 65 mg
Keywords: pistachio tiramisu, egg-free tiramisu, no egg tiramisu, pistachio dessert, easy tiramisu, italian dessert, nutty tiramisu, mascarpone tiramisu