How to Make Perfect Chocolate Easter Nests
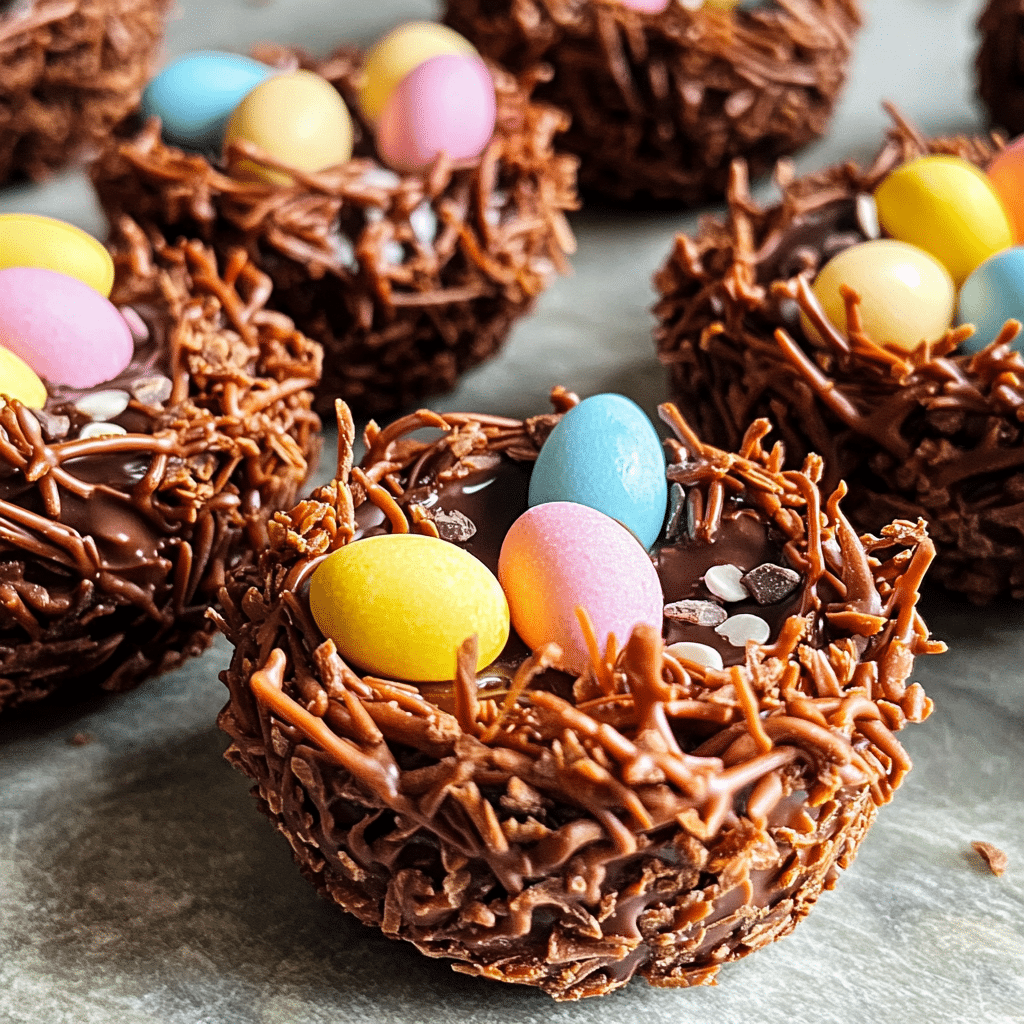
Chocolate Easter Nests are a delightful and festive treat that combines the rich creaminess of melted chocolate with crunchy textures to create edible nests filled with colorful candies. Perfect for celebrating the holiday season, these nests are not only fun to make but also irresistible to eat. Whether you’re baking with kids or looking for a simple and charming dessert, learning how to make easy, delicious Chocolate Easter Nests with simple ingredients will guarantee a festive surprise everyone will love.
Why You’ll Love This Recipe
- Simple Ingredients: Uses pantry staples that come together quickly without any fuss.
- Kid-Friendly Fun: Perfect activity to involve little hands in holiday baking and creativity.
- Versatile Design: Easily customized with any type of chocolate or candy for personal touches.
- Quick to Make: Takes less than 30 minutes from start to finish, making it ideal for last-minute treats.
- Great for Gifting: Beautifully festive nests make charming homemade gifts for friends and family.
Ingredients You’ll Need
Gathering a handful of simple, quality ingredients is all you need to create the perfect Chocolate Easter Nests. Each element plays a crucial role in delivering the nest’s delicate crunch and sweet chocolate flavor, resulting in the ideal balance of textures and colors that make the nests so festive and fun.
- Milk or Dark Chocolate: Choose good-quality chocolate for melting to ensure a smooth, rich flavor.
- Cornflakes or Shredded Wheat: Provides the crunchy, nest-like texture that holds the nests together.
- Mini Chocolate Eggs or Candy Eggs: Use these as the decorative “eggs” that complete the nest look.
- Butter: Adds richness and helps the chocolate melt smoothly.
- Golden Syrup or Honey: Acts as a natural binder adding slight sweetness and stickiness to hold the nest structure.
- Sprinkles (optional): For an extra colorful and festive touch on top of the nests.
Variations for Chocolate Easter Nests
One of the best things about Chocolate Easter Nests is how easy they are to customize! Whether you want to cater to dietary needs, experiment with flavor combinations, or just switch up the visual appeal, this recipe makes it simple to adapt.
- Vegan Version: Use dairy-free chocolate and substitute butter with coconut oil for a plant-based nest.
- Nutty Twist: Add crushed nuts like almonds or hazelnuts to the mix for extra crunch and flavor.
- White Chocolate Delight: Swap regular chocolate with white chocolate for a sweeter, creamier nest.
- Fruit-Infused: Mix in dried cranberries or raisins for bursts of chewy sweetness inside the nests.
- Gluten-Free Option: Use gluten-free cereal or crushed rice cakes to keep the recipe allergy-friendly.

How to Make Chocolate Easter Nests
Step 1: Melt the Chocolate
Start by gently melting your chosen chocolate with butter and golden syrup in a heatproof bowl over simmering water, or carefully in the microwave in short bursts. Stir frequently to achieve a smooth, glossy consistency.
Step 2: Combine Chocolate and Crunch
Once melted, quickly fold in your cereal of choice, coating each flake or piece evenly with the chocolate mixture. The cereal creates the base and structure for your nests.
Step 3: Shape the Nests
Use spoonfuls of the chocolate-coated cereal and place them onto a parchment-lined baking tray, gently shaping each mound into a shallow nest form with a small indent in the center for the eggs.
Step 4: Add Mini Eggs
Carefully place mini chocolate or candy eggs into the center of each nest while the mixture is still soft so they stick nicely once set.
Step 5: Chill Until Firm
Pop the tray into the fridge and allow the nests to set completely, usually about 30 minutes. This helps them firm up and hold their shape perfectly.
Pro Tips for Making Chocolate Easter Nests
- Use Quality Chocolate: Higher-quality chocolate melts smoother and tastes better, elevating your nests.
- Don’t Overmix: Fold gently to avoid breaking the cereal and keep the nest crispy.
- Work Quickly: Shape the nests before the chocolate starts to set to make molding easier.
- Chill Thoroughly: Ensure the nests are fully chilled before removing from the tray to prevent crumbling.
- Experiment with Cereals: Combining different cereals can add unique textures and flavors to your nests.
How to Serve Chocolate Easter Nests
Garnishes
Top your nests with colorful sprinkles, edible glitter, or extra mini eggs to make them look festive and inviting. Fresh mint leaves or tiny edible flowers can also add a fresh and pretty element.
Side Dishes
Serve Chocolate Easter Nests alongside a scoop of vanilla ice cream or a cup of hot cocoa for a delightful Easter dessert spread. They also pair well with fresh fruit to balance the sweetness.
Creative Ways to Present
Place the nests in small cupcake liners or transparent gift boxes tied with pastel ribbons to transform them into adorable party favors or holiday gifts. Arranging them on a decorative platter with edible grass paper enhances their festive nest-like appearance.
Make Ahead and Storage
Storing Leftovers
Store leftover Chocolate Easter Nests in an airtight container at room temperature or in the fridge to keep them crisp and fresh for up to one week.
Freezing
Wrap nests individually or in batches using freezer-safe containers for longer storage. They freeze well for up to three months and thaw quickly at room temperature.
Reheating
Chocolate Easter Nests are best enjoyed as is and do not require reheating. Thawed nests will retain their texture and flavor without needing warmth.
FAQs
Can I use milk chocolate or dark chocolate for this recipe?
Yes, both milk and dark chocolate work wonderfully for Chocolate Easter Nests depending on your taste preference. Dark chocolate tends to be richer, while milk chocolate is sweeter and creamier.
What if I don’t have golden syrup? Is there a substitute?
You can substitute honey, maple syrup, or corn syrup in equal amounts if golden syrup is not available, each adding a slight variation in sweetness and flavor.
Are Chocolate Easter Nests suitable for kids to make?
Absolutely! This recipe is very kid-friendly, involving simple stirring, shaping, and decorating steps that children can easily follow with supervision.
Can I make these nests gluten-free?
Yes! Use gluten-free cereal options such as gluten-free cornflakes or puffed rice to create nests that are safe for gluten intolerance.
How long do these nests keep fresh?
Chocolate Easter Nests stay fresh for up to a week if stored properly in an airtight container, away from heat and moisture which can cause melting or sogginess.
Final Thoughts
Chocolate Easter Nests are such a joyful, tasty treat that brings a burst of holiday cheer with every bite. Baking these easy nests with simple ingredients brings warmth, festive spirit, and a fun crafting experience to your Easter celebrations. So go ahead, give this recipe a try, and share the sweet magic of homemade Easter nests with your loved ones!
Related Posts
- Easy Copycat Little Debbie Valentine’s Day Cakes Recipe
- Why Blackberry Cheesecake Brownies Are Irresistible
- Why Easy Mango Sago Dessert is Perfect for Summer
Chocolate Easter Nests
Chocolate Easter Nests are a simple, festive treat combining melted chocolate and crunchy cereal to create edible nests filled with colorful mini eggs. Perfect for holiday celebrations, this quick and kid-friendly recipe uses pantry staples to create a deliciously sweet and crunchy dessert that can be customized with different chocolates and candies.
- Prep Time: 10 minutes
- Cook Time: 5 minutes
- Total Time: 30 minutes
- Yield: 12 nests 1x
- Category: Desserts
- Method: No-bake, chilled
- Cuisine: International
- Diet: Gluten Free
Ingredients
Core Ingredients
- 200g Milk or Dark Chocolate (good quality for melting)
- 100g Cornflakes or Shredded Wheat
- 50g Mini Chocolate Eggs or Candy Eggs
- 25g Butter
- 2 tbsp Golden Syrup or Honey
Optional Toppings
- Sprinkles for decoration (optional)
Instructions
- Step 1: Melt the Chocolate
Gently melt your chosen chocolate with the butter and golden syrup in a heatproof bowl set over simmering water or in short bursts in the microwave, stirring frequently until smooth and glossy.
- Step 2: Combine Chocolate and Crunch
Quickly fold in the cereal, ensuring each flake or piece is evenly coated with the chocolate mixture, forming the base and structure of the nests.
- Step 3: Shape the Nests
Spoon the chocolate-coated cereal onto a parchment-lined baking tray, gently shaping each mound into a shallow nest with a small indent in the center.
- Step 4: Add Mini Eggs
Place mini chocolate or candy eggs into the center of each nest while the mixture is still soft so they stick when set.
- Step 5: Chill Until Firm
Refrigerate the tray for about 30 minutes to allow the nests to set completely and hold their shape.
Notes
- Use quality chocolate for better flavor and smoother melting.
- Fold the cereal gently to avoid breaking and maintain crunchiness.
- Shape nests quickly before the chocolate starts to set.
- Ensure nests are fully chilled before removing from the tray to prevent crumbling.
- Experiment with different cereals or add-ins like nuts or dried fruits for unique textures and flavors.
Nutrition
- Serving Size: 1 nest
- Calories: 150
- Sugar: 12g
- Sodium: 20mg
- Fat: 9g
- Saturated Fat: 5g
- Unsaturated Fat: 3g
- Trans Fat: 0g
- Carbohydrates: 18g
- Fiber: 1g
- Protein: 2g
- Cholesterol: 10mg
Keywords: Chocolate Easter Nests, Easter dessert, no-bake nests, kid-friendly sweets, festive chocolate treats

