5 Easter Dirt Pudding Jars Recipes to Try Now
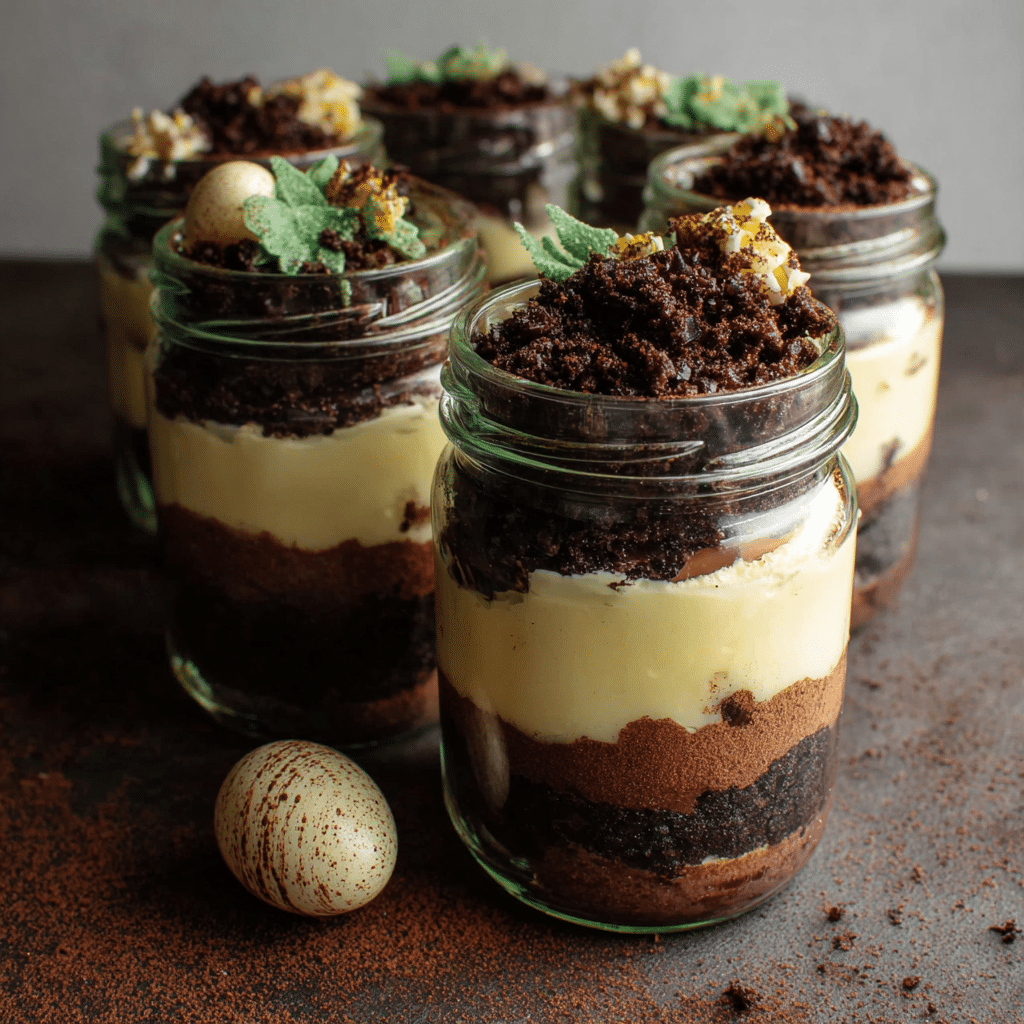
If you’re looking to add a burst of fun and flavor to your Easter celebrations, Easter Dirt Pudding Jars are the perfect treat! These delightful jars combine creamy pudding, crunchy cookies, and sweet surprises that feel like digging into a little garden of joy. Whether for family gatherings or sharing with friends, Easter Dirt Pudding Jars offer an easy-to-make, crowd-pleasing dessert that’s as visually charming as it is delicious. Dive into these 5 tasty recipes and find your new Easter favorite today!
Why You’ll Love This Recipe
- Party-Ready Presentation: Each jar looks like a mini garden, making it an instant conversation starter.
- Kid-Friendly Fun: Kids love both eating and helping to assemble the layers of colorful ingredients.
- Simple Ingredients: Uses everyday pantry staples that combine into a delicious, textured dessert.
- Customizable Flavors: Easily swap or add ingredients to suit your family’s taste buds or dietary preferences.
- Make-Ahead Convenience: Can be prepared in advance, making entertaining stress-free and smooth.
Ingredients You’ll Need
These Easter Dirt Pudding Jars rely on straightforward ingredients that bring each layer to life with creamy texture, cookie crunch, and sweet brightness. Here’s what you’ll need for a basic version and how each item contributes to the overall magic.
- Instant Pudding Mix: Choose chocolate or vanilla for a rich, creamy base that sets quickly.
- Milk: Essential for mixing the pudding and achieving that smooth consistency.
- Crushed Chocolate Cookies: Creates the “dirt” look and adds a satisfying crunch with every bite.
- Gummy Worms: Classic Easter Dirt garnish that adds playful color and chewy texture.
- Whipped Topping: Lightens the pudding mix and adds a fluffy, sweet contrast to the crunchy cookies.
- Mini Marshmallows or Sprinkles: Optional fun mix-ins that enhance appearance and flavor variety.
- Optional Fresh Fruit: Such as strawberries or blueberries for a fresh, natural sweetness and color pop.
Variations for Easter Dirt Pudding Jars
One of the best parts about Easter Dirt Pudding Jars is how easy it is to tailor them to your preferences or dietary needs. Mix and match ingredients to keep the experience fresh each time you make them!
- Dairy-Free Version: Use coconut milk pudding and coconut whipped cream for a creamy, allergy-friendly option.
- Peanut Butter Twist: Add a layer of peanut butter mousse for an irresistible nutty flavor boost.
- Fruit-Infused Dirt: Incorporate sliced strawberries or raspberries between layers for tart contrast.
- Oreo Variation: Swap the chocolate cookies for crushed Oreos to up the chocolate intensity.
- Vegan Dirt Pudding: Substitute with plant-based pudding and skip marshmallows or use vegan candy for garnish.

How to Make Easter Dirt Pudding Jars
Step 1: Prepare the pudding
Start by whisking the instant pudding mix with cold milk according to the package instructions until it thickens to a smooth, creamy consistency.
Step 2: Crush the cookies
Place your chocolate cookies into a resealable bag and crush them using a rolling pin or your hands until you have small, dirt-like crumbs.
Step 3: Layer the jars
Begin by spooning a layer of crushed cookies at the bottom of each jar, followed by a layer of pudding, then a dollop of whipped topping. Repeat layers until jars are nearly full, finishing with a cookie crumb topping.
Step 4: Add the fun extras
Garnish each jar with gummy worms poking out of the “dirt” and a sprinkle of mini marshmallows or colorful sprinkles to add visual appeal and extra sweetness.
Step 5: Chill and serve
Place the jars in the refrigerator for at least 30 minutes to allow the pudding to set and the flavors to meld before serving.
Pro Tips for Making Easter Dirt Pudding Jars
- Use fresh whipped topping: It keeps the pudding light and fluffy rather than dense or overly sweet.
- Don’t over-crush cookies: Keep some larger crumbs for an authentic “dirt” texture and added crunch.
- Chill jars first: Cooling the jars before assembly helps pudding hold better and keeps layers distinct.
- Layer carefully: Take your time with layers for a beautiful, striped look that impresses guests.
- Experiment with jar sizes: Mini jars are great for kids’ parties, while larger ones can serve as an individual dessert centerpiece.
How to Serve Easter Dirt Pudding Jars
Garnishes
Top with classic gummy worms, edible flowers, or pastel-colored candy eggs to create a festive look that fits perfectly with the Easter vibe.
Side Dishes
Serve alongside fresh fruit platters, carrot sticks with hummus, or a light spring salad to balance the sweetness of the pudding jars.
Creative Ways to Present
Arrange jars on a decorative tray filled with shredded green paper to mimic grass, or cluster them with fun Easter-themed treats like chocolate bunnies and jelly beans.
Make Ahead and Storage
Storing Leftovers
Store any leftover Easter Dirt Pudding Jars in airtight containers in the refrigerator for up to 3 days to keep them fresh and tasty.
Freezing
Freezing is not recommended as pudding texture can become watery or grainy when thawed, diminishing the dessert’s quality.
Reheating
This dessert is best served cold, so reheating is not advised. Simply make ahead and chill until ready to enjoy.
FAQs
Can I make Easter Dirt Pudding Jars vegan?
Yes! Use dairy-free pudding mixes, plant-based milk, and vegan whipped topping alternatives, and skip gelatin-based candies to make a vegan-friendly version.
How long can I store Easter Dirt Pudding Jars in the fridge?
They keep well for 2 to 3 days refrigerated if covered tightly, making them perfect for prepping ahead of time.
What can I use instead of gummy worms?
You can substitute gummy bears, candy rocks, or even small chocolate chips for a fun twist on tradition.
Can I prepare Easter Dirt Pudding Jars without instant pudding?
Absolutely. You can make homemade pudding from scratch or use flavored yogurt for a different but delicious texture.
Are these jars suitable for children?
Yes! These dessert jars are fun and safe for kids; just be mindful of any allergies from ingredients like nuts or gelatin in candies.
Final Thoughts
Easter Dirt Pudding Jars are a playful, delicious way to bring smiles to your holiday table. Their simplicity combined with the ability to customize ensures they’ll become a new family favorite. So grab your ingredients, invite your loved ones to help, and dig into these fun, festive jars today!
Related Posts
- How to Make Easter Cadbury Fudge Easily
- Easy Easter Cookies Recipe to Sweeten Your Day
- Easy Easter Bunny Coconut Tails Recipe to Try
Easter Dirt Pudding Jars

Easter Dirt Pudding Jars are a fun and festive no-bake dessert perfect for celebrating Easter. Combining layers of creamy pudding, crunchy chocolate cookie crumbs, and playful garnishes like gummy worms and marshmallows, these jars resemble mini edible gardens. Easy to prepare, customizable for dietary preferences, and visually charming, they make an ideal crowd-pleaser for family gatherings or parties.
- Prep Time: 10 minutes
- Cook Time: 0 minutes
- Total Time: 40 minutes (including chilling time)
- Yield: 6-8 jars 1x
- Category: Dessert
- Method: No-Bake
- Cuisine: American
- Diet: Customizable (Gluten Free if gluten-free cookies used)
Ingredients
Basic Ingredients
- 1 package Instant Pudding Mix (chocolate or vanilla)
- 2 cups Cold Milk
- 15–20 Chocolate Cookies, crushed (for dirt)
- 1 cup Whipped Topping (such as Cool Whip)
- Gummy Worms (for garnish)
- Mini Marshmallows or Sprinkles (optional)
- Optional Fresh Fruit (e.g., strawberries or blueberries)
Variation Ingredients (Optional)
- Coconut Milk Pudding and Coconut Whipped Cream (for dairy-free version)
- Peanut Butter Mousse Layer (for peanut butter twist)
- Crushed Oreos (instead of chocolate cookies)
- Plant-based Pudding and Vegan Candy (for vegan version)
Instructions
- Prepare the pudding: Whisk the instant pudding mix with cold milk according to the package instructions until it thickens into a smooth, creamy consistency.
- Crush the cookies: Place chocolate cookies in a resealable bag and crush them using a rolling pin or your hands until small, dirt-like crumbs form.
- Layer the jars: Spoon a layer of crushed cookies into the bottom of each jar, followed by a layer of pudding, then a dollop of whipped topping. Repeat layers until jars are nearly full, ending with a cookie crumb topping.
- Add the fun extras: Garnish each jar with gummy worms poking out from the top and sprinkle mini marshmallows or colorful sprinkles for extra visual appeal and sweetness.
- Chill and serve: Refrigerate the jars for at least 30 minutes to allow the pudding to set and the flavors to meld before serving.
Notes
- Use fresh whipped topping to keep the dessert light and fluffy.
- Don’t over-crush cookies; keep some larger crumbs for authentic dirt texture and crunch.
- Chill jars before assembly to help pudding hold better and keep layers distinct.
- Layer carefully for a beautiful striped look that impresses guests.
- Experiment with jar sizes: mini jars for kids, larger jars for individual dessert centerpieces.
Nutrition
- Serving Size: 1 jar (approx. 1 cup)
- Calories: 250
- Sugar: 20g
- Sodium: 150mg
- Fat: 12g
- Saturated Fat: 7g
- Unsaturated Fat: 3g
- Trans Fat: 0g
- Carbohydrates: 30g
- Fiber: 1g
- Protein: 3g
- Cholesterol: 15mg
Keywords: Easter, pudding jars, dirt pudding, no bake dessert, kid friendly, party dessert, chocolate pudding, vanilla pudding, easy dessert