Why Hawaiian Butter Mochi Recipe Is Irresistible

If you have a sweet tooth and love exploring unique desserts, then you must try the Hawaiian Butter Mochi Recipe. This delightful treat combines the rich, buttery flavor with a chewy, slightly crispy texture that makes it incredibly addictive. Perfect for festive occasions or simply satisfying a dessert craving, this recipe brings a taste of Hawaii directly to your kitchen. With a few simple ingredients and easy steps, you’ll soon be enjoying a lush, comforting dessert that’s loved by many.
Why You’ll Love This Recipe
- A chewy texture sensation: The combination of glutinous rice flour and butter creates a unique, chewy bite that is unlike any other dessert.
- A buttery, rich flavor: Every bite melts in your mouth with the perfect buttery balance that keeps you coming back for more.
- Simple ingredients, big impact: You only need a handful of basic ingredients that come together to create a memorable delight.
- Great for any occasion: Whether it’s a holiday, party, or casual snack, this mochi fits perfectly on the dessert table.
- Easy to customize: You can add flavors or toppings to tailor the mochi just the way you like it.
Ingredients You’ll Need
The Hawaiian Butter Mochi Recipe relies on simple ingredients that each play a vital role in defining its flavor and texture. From the sticky rice flour that delivers the chewiness to the sweetness of sugar balancing the butter’s richness, every component matters.
- Glutinous rice flour: This is essential for that signature chewy texture that mochi is known for.
- Granulated sugar: Adds sweetness and aids in creating the slightly crispy crust on top.
- Butter: Provides richness and a smooth, savory undertone.
- Evaporated milk: Boosts creaminess and adds a subtle caramel flavor.
- Large eggs: Help bind the ingredients and give structure to the mochi.
- Baking powder: Ensures a gentle lift and lighter texture without compromising chewiness.
- Vanilla extract: Adds warm aroma to complement the buttery flavor.
Variations for Hawaiian Butter Mochi Recipe
The beauty of this recipe lies in its adaptability. Feel free to experiment with flavor profiles or dietary tweaks to make it your own. It’s easy to swap ingredients or enhance with your favorite add-ins to fit your taste preferences or nutritional needs.
- Matcha infusion: Add matcha powder to the batter for a vibrant green color and an earthy twist.
- Chocolate lover’s version: Mix in cocoa powder or chocolate chips for a luscious chocolaty treat.
- Dairy-free option: Substitute coconut milk and vegan butter for a plant-based delight.
- Nutty crunch: Mix chopped macadamia nuts into the batter for added texture and a tropical flair.
- Fruit flavors: Swirl in mashed pineapple or mango puree for a fresh, fruity version.

How to Make Hawaiian Butter Mochi Recipe
Step 1: Prepare the baking dish
Start by greasing a square baking pan generously with butter or lining it with parchment paper for easy removal of the mochi after baking.
Step 2: Mix dry ingredients
In a large bowl, whisk together glutinous rice flour, sugar, and baking powder to ensure an even distribution for a well-risen, chewy texture.
Step 3: Combine wet ingredients
In a separate bowl, beat the eggs and then whisk in melted butter, evaporated milk, and vanilla extract until fully incorporated and smooth.
Step 4: Blend wet and dry ingredients
Slowly pour the wet mixture into the dry ingredients, stirring continuously to create a smooth, lump-free batter.
Step 5: Pour and bake
Transfer the batter to your prepared pan, smoothing the top with a spatula. Bake in a preheated oven at 350°F (175°C) for about 50 to 60 minutes until the top turns lightly golden and a toothpick inserted comes out clean.
Step 6: Cool and cut
Allow the mochi to cool completely before cutting into squares; this helps it set properly, leading to perfect chewy layers.
Pro Tips for Making Hawaiian Butter Mochi Recipe
- Ensure even mixing: Fully combine wet and dry ingredients to avoid lumps that can affect texture.
- Do not overbake: Baking just until golden keeps the mochi soft inside while crisp outside.
- Use room temperature ingredients: This helps batter blend more smoothly for a uniform texture.
- Grease the pan well: Prevent sticking and ensure easy removal after baking.
- Cool completely before slicing: This allows the mochi to firm up for clean, neat pieces.
How to Serve Hawaiian Butter Mochi Recipe
Garnishes
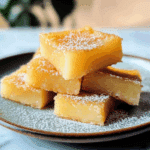
Sprinkle toasted shredded coconut or powdered sugar on top to add whimsy and contrast to the buttery mochi flavor profile.
Side Dishes
Serve alongside a hot cup of Hawaiian coffee or as a sweet ending to a tropical meal with fresh fruit like mango or pineapple slices.
Creative Ways to Present
Cut the mochi into bite-sized cubes and skewer them on small sticks for fun party platters or arrange them on decorative plates with edible flowers for an elegant touch.
Make Ahead and Storage
Storing Leftovers
Keep any leftover mochi in an airtight container at room temperature for up to 2 days, or in the refrigerator for up to a week to maintain freshness.
Freezing
Wrap cutting squares tightly in plastic wrap and place in a freezer-safe bag to freeze for up to 3 months; thaw overnight in the fridge before enjoying.
Reheating
Warm mochi gently in a microwave for 20-30 seconds or in a low oven to bring back its soft, chewy texture before serving.
FAQs
What makes this recipe uniquely Hawaiian?
The use of glutinous rice flour and butter together creates a chewy yet rich dessert that reflects the fusion of cultural influences found in Hawaiian cuisine.
Can I use regular rice flour instead of glutinous rice flour?
Regular rice flour will not yield the signature chewy texture; glutinous rice flour is essential for this recipe’s distinctive bite.
Is this recipe gluten-free?
Yes, as it uses glutinous rice flour, which contains no gluten, making it a great treat for those with gluten sensitivities.
How long will the mochi keep fresh?
Stored properly, the mochi stays fresh for about 2 days at room temperature and up to a week if refrigerated.
Can I make this recipe vegan?
With substitutions like coconut milk for evaporated milk and vegan butter, you can easily create a delicious vegan version of this Hawaiian Butter Mochi Recipe.
Final Thoughts
The Hawaiian Butter Mochi Recipe offers a truly irresistible dessert experience with its unique texture and buttery flavor. Whether you’re treating yourself or sharing with friends, this recipe is simple to make and endlessly customizable. Give it a try and bring some aloha spirit to your kitchen—your taste buds will thank you!
Related Posts
- Easy Copycat Little Debbie Valentine’s Day Cakes Recipe
- Why Blackberry Cheesecake Brownies Are Irresistible
- Why Easy Mango Sago Dessert is Perfect for Summer
Hawaiian Butter Mochi Recipe
Hawaiian Butter Mochi is a rich, buttery dessert known for its unique chewy texture and slightly crispy top. Made with glutinous rice flour and simple ingredients, this festive treat brings the authentic taste of Hawaii to your home kitchen. Perfect for celebrations or casual snacking, it melts in your mouth with a perfect balance of sweetness and creaminess.
- Prep Time: 15 minutes
- Cook Time: 50-60 minutes
- Total Time: 1 hour 15 minutes
- Yield: 16 squares 1x
- Category: Desserts
- Method: Baking
- Cuisine: Hawaiian
- Diet: Gluten Free
Ingredients
Main Ingredients
- 2 cups glutinous rice flour
- 1 1/2 cups granulated sugar
- 1 teaspoon baking powder
- 4 large eggs
- 1 cup (2 sticks) unsalted butter, melted
- 1 can (12 oz) evaporated milk
- 1 teaspoon vanilla extract
Instructions
- Prepare the baking dish: Grease a square baking pan generously with butter or line it with parchment paper for easy removal of the mochi after baking.
- Mix dry ingredients: In a large bowl, whisk together glutinous rice flour, granulated sugar, and baking powder to distribute the leavening and sweetness evenly for a well-risen, chewy texture.
- Combine wet ingredients: In a separate bowl, beat the large eggs, then whisk in the melted butter, evaporated milk, and vanilla extract until the mixture is smooth and fully incorporated.
- Blend wet and dry ingredients: Slowly pour the wet mixture into the dry ingredients, stirring continuously until a smooth, lump-free batter forms.
- Pour and bake: Transfer the batter to the prepared pan, smoothing the top with a spatula. Bake in a preheated oven at 350°F (175°C) for 50 to 60 minutes, or until the top is lightly golden and a toothpick inserted in the center comes out clean.
- Cool and cut: Let the mochi cool completely in the pan before cutting it into squares. This allows the dessert to set properly and achieve the perfect chewy texture.
Notes
- Ensure even mixing of wet and dry ingredients to avoid lumps and achieve optimal texture.
- Do not overbake; baking until just golden maintains a soft inside and crisp outside.
- Use room temperature ingredients for smoother batter blending and uniform texture.
- Grease the pan well to prevent sticking and facilitate easy removal.
- Cool completely before slicing to obtain clean, neat pieces.
Nutrition
- Serving Size: 1 square (about 2 inches)
- Calories: 220
- Sugar: 18g
- Sodium: 85mg
- Fat: 12g
- Saturated Fat: 7g
- Unsaturated Fat: 4g
- Trans Fat: 0g
- Carbohydrates: 25g
- Fiber: 0g
- Protein: 3g
- Cholesterol: 70mg
Keywords: Hawaiian butter mochi, mochi recipe, chewy dessert, gluten free dessert, Hawaiian desserts